




Water-Effect Gel
A thick material that dries transparent can be textured with a brush, palette knife or dabbing technique. It is particularly suitable for individual water strands, rapids and transitions into the plunge pool below.

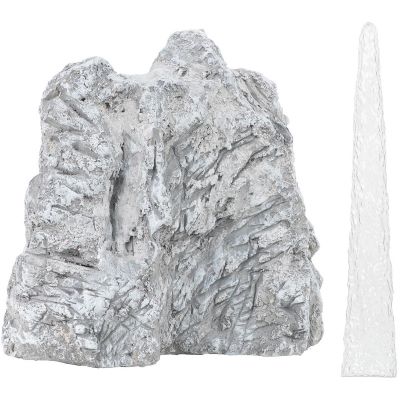
A waterfall combines height, rocks and moving water to create a powerful scenic feature. Discover how to design the drop edge, flowing water, spray, stream bed and banks so that the waterfall blends naturally into your model railway landscape.
A waterfall works particularly well on a model railway when its formation can be understood from the surrounding terrain. The water should arrive above the drop from a stream, spring or small pool, pass over a clear change in elevation and continue below into another stream or plunge pool. A transparent strip of water starting halfway down an isolated rock face can quickly look like an accessory added afterwards.
Construction therefore begins with the terrain shape . Plan the difference in height, the drop edge and the lower watercourse first. On a high mountain waterfall, the rocks can dominate the scene. A small forest waterfall, on the other hand, may need only a low step between vegetated stones. Several short cascades can also look more natural than a single vertical drop.
When building waterfalls on a model railway, two fundamentally different approaches are possible: a visually simulated dry waterfall made from transparent effect materials, or an operating system with real circulating water. For most permanent indoor model railway layouts, the dry version is easier to control. It requires no water reservoir and can be combined directly with model water, effect gel and foam and spray .
Transparent effect materials should be shaped so that individual strands of water remain visible. The waterfall should not look like one solid white wall. Rock projections divide the flow into separate streams, turbulence and fine spray. The surface in the plunge pool below is more strongly disturbed, while only a short distance downstream the stream can become noticeably calmer again.
A thick material that dries transparent can be textured with a brush, palette knife or dabbing technique. It is particularly suitable for individual water strands, rapids and transitions into the plunge pool below.
The water flow is first modelled flat on a suitable smooth surface. Once fully dry, the transparent section can be carefully removed, trimmed and installed between the drop edge and the pool below.
A transparent water body creates the stream and plunge pool. Effect gel and foam are then used only where gradients, rocks and impacts make the flow visibly turbulent.
A pump returns real water from a lower reservoir to the upper stream. This creates genuine movement but requires careful sealing, maintenance access and safe separation between water and the electrical parts of the model railway.
Thick water-effect materials can be shaped in the direction of flow on a smooth surface. Once completely dry, the waterfall can be removed carefully and installed in the scenery. Its length, width and surface structure can therefore be checked before final installation.
A waterfall looks particularly convincing when the rock structure supports the path of the water. Water naturally follows the lowest point at the drop edge and runs through depressions or channels. A completely horizontal, razor-sharp ledge therefore usually looks artificial.
Rock projections of different sizes divide the flow and create cascades. In steep mountain scenery, an upper stream can disappear between rock faces and only become visible again shortly before the drop. Below the waterfall, an eroded plunge zone with larger rocks and more turbulent water often looks convincing.
Colour also contributes strongly to the result. Rocks immediately beside the water often appear darker than dry areas. Use subtle washes to emphasise this difference. Moss, small grasses and waterside vegetation can soften transitions, but they should not cover every visible rock surface.
A stream or small pool explains where the falling water originates.
Rock projections and channels break up an artificially geometric edge.
A depression, rocks and spray make the energy of the falling water visible.
The water must continue logically below the waterfall.
Plan the upper stream, drop edge and lower plunge pool together. Check the complete scene from the normal viewing position.
A small waterfall can look more believable than an oversized vertical drop that does not suit the surrounding landscape.
Use rigid foam, rock filler, casting moulds or suitable terrain components to create an irregular step with several projections.
Leave the intended watercourse clear while building the rocks instead of cutting it through a finished wall afterwards.
Model the stream bed above and the pool below, close all joints and colour the base to suit the intended appearance of the water.
The plunge pool can become darker towards the centre to create the impression of greater depth.
Shape a transparent-drying water-effect material on a suitable smooth surface in several vertical strands.
Make the strands different widths and avoid keeping them completely parallel.
Carefully remove the fully dried effect section and secure it between the drop edge and the lower water area.
Blend the upper and lower transitions afterwards with fresh water-effect material.
Draw water-effect material in the direction of flow over rock steps, through the stream and across the plunge pool. Add small eddies and diverging structures behind obstacles.
Do not texture the entire water surface equally strongly.
Use light foam effects only around the drop edge, impact zone and rocks exposed to strong current. Transparent areas of water should remain visible.
Too much white can quickly make a waterfall look like snow or cotton wool rather than moving water.
After everything has cured completely, add gravel, grasses, moss, bushes and selected branches and blend the waterfall into the surrounding landscape.
Preserve exposed rock surfaces instead of covering the complete scene with vegetation.
A waterfall comes alive through the contrast between transparent water and areas filled with air and foam. Along the free-falling section, much of the water remains transparent. Whitish areas occur mainly around rock projections, the drop edge and the point where the water strikes the pool or rocks below.
Products such as NOCH Foam & Spray are designed specifically for these highlights. It is better to work in several small stages than to apply a large amount immediately. A slightly irregular application creates finer structures and allows the transparent water underneath to remain visible.
Below the waterfall, turbulence gradually decreases with distance. The strongest spray is located directly at the impact point. Smaller waves and eddies follow before the stream becomes calmer. This graduation creates considerably more realism than distributing the same white texture over the complete water surface.
Yes. A small pump circuit can return real water from a lower reservoir through a hose to the upper stream. The FALLER 180627 Water Pump is specifically intended for applications including waterfalls, flowing streams, lakes, water features, fountains and water mills.
A real-water installation places considerably greater demands on the layout. Pools, hoses and connections must remain watertight. The pump must stay accessible for cleaning, maintenance and replacement. The watercourse should also be designed so that splashes cannot reach track, decoders, turnout drives, electrical contacts or other electrical components.
For a normal indoor model railway, a simulated waterfall is generally easier to maintain. Real water is most suitable when functional operation is an intentional part of the project and all technical components remain permanently accessible.
The lower pool must hold sufficient water and remain easy to access.
Maintenance, cleaning and replacement should not require demolition of the surrounding scenery.
Test the complete water path and all connections thoroughly before permanently concealing them.
Protect electrical components from leaks and splashing and follow all manufacturer instructions.
Use pumps only in accordance with their instructions and specified power supply. The FALLER 180627 pump is specified for 12–16 V AC. Power supplies, plug connections, digital equipment and exposed electrical contacts must not be installed in damp areas or where they could be exposed to splashing water.
| Gauge | Scale | Suitable Waterfall Effect | Pay Particular Attention To |
|---|---|---|---|
| Z | 1:220 | Fine cascades and distant mountain scenery | Use very thin water strands and fine stones |
| N / Nm | 1:160 | Deep valleys and extensive scenery in a small area | Avoid oversized spray and rock textures |
| TT / TTe / TTm | 1:120 | Mountain streams with clearly visible cascades | Combine universal water materials with correctly scaled plants |
| H0 / H0e / H0m / H0f | 1:87 | Detailed rocks, bridges and water structures | All H0 narrow-gauge variants use the same scenery scale |
| 0 / 0e / 0m | approx. 1:45 | Large, highly three-dimensional individual scenes | Detail water strands, moss and rocks more strongly |
| 1 | 1:32 | Highly effective dioramas and mountain scenes | Plan material quantities and waterfall height in advance |
| G / IIm / II | approx. 1:22.5 and larger | Large garden railway and mountain scenes | Outdoors, use only suitable weather-resistant materials |
Water effects, model water, Water-Drops® and accessories for realistic water scenes.
Model rock steps, stream beds, ravines and terrain transitions.
Add natural texture to stream beds, rock bases and eroded areas.
Create damp banks and natural transitions between rocks and scenery.
Delicate waterside vegetation for streams, plunge pools and damp rock areas.
Add railway and road bridges across ravines and watercourses.
Colour wet rocks, stream beds and deeper water areas realistically.
Permanently secure rocks, effect pieces, plants and scenery materials.
Combine all essential materials for mountains, ravines, streams and waterfalls.
The manufacturer pages provide direct access to model water, effect materials, rocks, scenery construction and matching products.





When this section approaches the viewport, the finder loads suitable products from several current webshop categories. Filter by water effects, rock materials, shoreline scenery, bridges and other landscaping products. Archived products and items explicitly marked as no longer offered are excluded. Stock and delivery status are not displayed on the cards.
Matching waterfall products will be loaded …
A visible upper stream makes the scene logical. A spring, stream or small pool above the drop is already sufficient.
Transparent water strands form the basis. Whitish foam belongs primarily around the drop edge, rock contacts and impact zone.
Different widths, separate streams and small changes in direction create a much more natural water surface.
A visibly turbulent pool explains the impact of the falling water and creates a natural transition into the downstream stream.
A subtle darker wash along the watercourse creates a convincing damp-rock effect with relatively little effort.
With pump operation, the reservoir, pump and hose connections must remain accessible after the surrounding scenery is completed.
First build the upper stream, rock step and lower plunge pool. Then create the transparent water flow with a suitable effect material. Once installed, blend the transitions and add currents, foam and spray.
Thick water-effect materials that dry transparent are particularly suitable. They can be shaped directly in the landscape or first modelled on a suitable smooth surface.
Apply spray sparingly around the drop edge, rocks and especially the impact area. Most of the falling water should remain transparent or only slightly whitish.
Yes. A suitable pump can return water from a lower reservoir to the top of the waterfall. Watertight construction, maintenance access and safe separation from electrical components must be planned carefully.
There is no fixed ideal height. The model scale, existing terrain and overall appearance are decisive. On a compact layout, a small waterfall can look more convincing than an extreme rock wall.
The water itself remains predominantly transparent. White appears visually where air becomes mixed into strongly turbulent water. The colour of the plunge pool below is largely determined by the prepared base underneath the water.
Model several rock steps of different heights with small pools between them. Each step receives its own short water flow and a limited spray zone.
Above the waterfall, the stream runs directly to the drop edge. Below it, the plunge pool gradually narrows and becomes the continuing stream. Water textures should always follow the direction of flow.
Water-effect materials are generally scale-independent and can be used for Z, N, TT, H0, H0e, H0m, Gauge 0, Gauge 1 and G. Rocks, plants, bridges and other visible details must match the respective model scale.
Yes. A transparent water flow can be modelled on a suitable smooth surface, removed after drying and then installed in the prepared scenery.
In nature, foam formation depends on the height of the drop, obstacles and turbulence. A mixture of calm and strongly moving areas therefore creates a much more realistic result.
Final vegetation is best added only after the water and effect materials have completely cured. This keeps plants and grass fibres free from accidentally applied effect material.
Continue your project with further guides covering mountains, rocks, water scenery, slopes, roads, vegetation, track and layout planning.